Friday, July 31, 2015

Card Design: Imagine That...Jars of Christmas Cheer


Good afternoon everyone!  It is time to show you my final Imagine That! Digis by Kris project for July. 

If you have been checking out the Imagine That! Digis by Kris blog over the course of this past month, you know that a big focus of it has been on celebrating the theme, 'Christmas in July' which means I got to add two bonus cards to my Christmas Card Pot.  Whoop, whoop!

Christmas Cards to date for 2015:  19

This time around I have used goodies from one of Kris' older sets.  If you have been part of the IT! DbK Digi of the Month Challenge, you will recognize the set from last year. 

General Info:
  • This time around I wanted to do something a little bit different so I thought outside of the box--well outside the square actually--and came up with a card I am pretty pleased with!

OVERALL VIEW

Digital Image Details: 
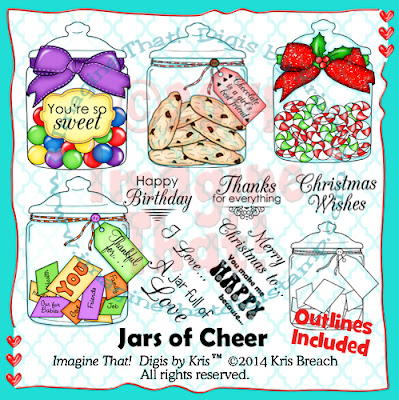
  • Jars of Cheers: I looked through the sets that I had and decided that the Jars of Cheers set would be perfect for what I wanted to accomplish.  I just love this set as it has so many different options.  When I first used the set I created an anniversary card for my parents where I took the jar with the empty notes and added words that had to do with a successful relationship.  Words like love, commitment, patience, communication, etc.  Given that my parents have been married for over 52 years, I thought that appropriate.  I have also used it for a Christmas card earlier this past year and decided to go the Christmas route with it for this creation as well but I know I will be using this set again and again given all the different options available in it.  Please click on the watermark below to find the set in the store. 
http://www.imaginethatdigistamp.com/store/p287/Jars_of_Cheer.html

General Details:
  • I brought the image into one of the programs that I use, Libre Office Draw, and duplicated it.  Then I flipped one of them and lined it up as close as I could to the mid-line.
  • After it was printed out, I fussy cut leaving a slight border and then folded it down the middle.

FRONT
General Details:
  • To add a little extra oomph,  I decided to add a tag and some ribbon.  So I took one of the images from the Jars of Cheers set that had a tag on it and brought it into Photoshop Elements.  I erased everything but the tag shape itself.  
  • I added a layer style from Sheila Reid, a designer at Pixel Scrapper to give the tag a bit of sparkle.
  • Next I added the sentiment (which is also available in the Jars of Cheers set) to the front of the tag, printed and fussy cut it as well, added some string (Crafts brand, purchased at Dollarama) and affixed it to the front of the card. 
  • Then I double wrapped some string around the lip and created a bow.
  • The final step was to print another copy of the big red bow and holly, fussy cut it out and layer it on top so that it appears that the string is in behind.

INSIDE
 General Details:
  • I decided to keep the inside of the card pretty simple.  I just added a sentiment (details below) and a sticker on the left hand side to give it a little extra colour. 
Digital Sentiment Details:
  • This sweet sentiment was created by Paulette from Create with TLC and is the perfect accompaniment with the peppermint twist candies on the front.  Click HERE to go to Paulette's blog and HERE to go to the store.

OVERALL
Paper Products:
 
  • Card, image and sentiment bases: Michael's Recollection's Cardstock, white.
  • Matting is from Michael's open stock scrapbook paper. 
Challenges I am hoping to enter...

***Please note that if the word verification appears, ignore it and simply click the 'publish' button***  

Before you go, check this out...
Did you know that Imagine That! Digis by Kris has an extra special challenge going on until August 15th?!  It is called the Any Vendor Embellishment Contest.  Simply link up  your best cards that show your favourite embellishment! You are allowed to link a maximum of 3 different cards. The great thing is that the cards do not have to be new ones, they just have to be yours AND the card can showcase ANY vendors' images, it doesn't have to be a card with an IT! DbK image on it (although we'd love to see any that do).  Kris will draw a winner or winners (depending on the number of links we get) on August 15th who will win a $15 gift certificate to the digi shop!  So, start looking through all your old cards now!  You can find the link up and all the details you need by clicking HERE.

Also, get ready for August...


Well folks, that is it for today.  

Stay tuned for more Imagine That! Digis by Kris creations coming your way soon, along with all my regular features and design team posts. 

Until next time,

Wednesday, July 29, 2015

Decoration Design: Christmas Continues with Nicecrane Designs

http://nicecranedesigns.com/

Hello on this lovely Wednesday evening.  It is time to share my latest Nicecrane Designs creation with you all.  I've been on a bit of a 'Christmas in July' kick this month and it continues with today's creation.

Ignacio has these wonderful pyramid style ornaments and I decided I would try my hand at putting one together.  This one uses a sweet vintage image from the Funny Christmas Ball I collection. 

Now I have to warn you that it didn't turn out very well at all.  In fact, this post is going to serve as...
 
A Cautionary Tale on What NOT to Do
  1. The first thing I learned is that you really shouldn't print out the template on ordinary copy paper.  I thought I'd be brilliant and save some of my cardstock.  WRONG DECISION.  Printing on anything other than cardstock just makes your pieces too flimsy.
  2. Invest in a good pair of eyes and a steady hand OR have someone else cut the circles for you.  Yeah, I wouldn't exactly call the shapes I ended up with as being circular.
  3. Don't be skimpy with your pop dots.  I only had a few pop dots left (actually I still haven't been able to get anymore as of yet) so I thought that I would conserve them by cutting them into four.  WRONG DECISION.   Of course, it might also have to do with the fact that the paper is so flimsy but all the pieces have definitely warped a bit.
  4. Be sure to line up the midpoint of the top of the built up pyramid with the hole that is going to serve as the top.  Right now the kids are on a bit of lean and the whole thing looks off kilter.
  5. Finally, don't leave your completed ornament anywhere near where your cat prowls.  REALLY WRONG DECISION.  Now the ornament looks even more warped and battered than it did before.  Oy vey!
So apologies to Ignacio for doing such a poor job with this ornament.  However, I hope it provides you, my readers, with a list of things NOT TO DO when you decide to make one of your own.  

Once I finally get the chance to purchase more pop dots, I will be trying again.  I will definitely not be repeating these same mistakes.


OVERALL
Digital Image Details: 
  • Funny Christmas Ball I:  This set features two wonderful templates for creating your own ornament.  For this decoration I used the image you see in the top right hand corner of the preview below.  Click on the name or the watermark below to take you to its location in the store.
Funny Christmas Ball
Paper Products:  
  • Decoration base: Michael's Recollection's Cardstock.
  • Image base:  Standard Photocopy paper (A BIG NO-NO). 
Ribbon:
  • Crafts brand, purchased at Dollarama.

Before I go... 
Perhaps I can entice you into checking out another of the pyramid balls?!  This one is called Christmas Ball by Bowyle.  I have plans for it as well and I'm praying I will do a much better job with it. (click on image below to head to its location).
Christmas Ball by Bowyle (Pyramid Style)
Don't forget, to stay current on ALL the latest releases and to check out the fabulous inspiration from my fellow DT members, be sure to head over to the Nicecrane Designs blog.
 

Thanks for popping in and checking out my latest creation even if it wasn't all that good.

Stay cool my friends if you are experiencing summer where you are.  I'll see you all again very soon with another creation. 

Until next time,

Wonderful Wednesdays--Offering for July

If you are new to my blog and want to know how this concept got started, you can find the original post by clicking HERE

Hello peeps.  I actually managed to pull off getting this done. I honestly wasn't sure I would manage.  

If you are new to my blog in the past year, you can find other items for the July kit by clicking on the respective links below:

July 2013
  • The word July offered up as a word art creation in four different colours, plus a patterned paper depicting a star chart scene, offered in three different colours. Click HERE.
  • A word art creation that says 'under the stars'.  Click HERE.
  • A ribbon with stars on it, offered in three different colour combos, plus bonus date stamp.  Click HERE.

I decided to create a stars paper for this year's portion to the kit.  Check it out...

https://app.box.com/s/3991ufzq89ina8idaeox9o2esbycde08

EDIT:  Download button is active again.  Not sure what happened.  I double checked it before publishing it but the link disappeared.  Must be gremlins again.

This digital paper is 3600 x 3600 pixels, in jpg format and published at 300 dpi. I've used resources from Pixel Scrapper and HG Graphic Designs. To grab it, click the download button to be taken to a download location.  In the zip folder you will find a copy of the paper, its preview sheet, the full credit information and my terms of use which are standard to all my folders.

Finally, you can find your bonus stamp for July below.  You can just left click on this one to bring it up in the lightbox and then right click to save it in its original size which is approx. 3600 x 192 pixels (12 inches x .64 inches).  


Stay tuned for a new Wonderful Wednesday post coming next month!  

I might see you a bit later.  I'm going to try and get another DT post finished.

Until then,


Tuesday, July 28, 2015

Card Design: From the Heart Stamps July Challenge

http://fromtheheartstamps.com/community/blog/
Man!  I am quickly running out of 'month' so it is a good thing I finished my card last night for the July, From the Heart Stamps (FTHS) progressive stamp of the month challenge. I'd hate to lose out on the wonderful opportunity to earn incredible stamp sets from such an amazing designer by not getting my project completed in time!  Now I just have to remember to actually link it.  I decided to check and make sure my Deedee's Digis card from last week was linked, and it wasn't!  Man it is a good thing I checked.

Anyway...in order to enter the FTHS progressive challenge, you must either have received the latest image by having participated in the previous month or you can buy the stamp for the current month's challenge.  Everyone who enters and follows the rules is a winner because you automatically get the stamp for the next month's challenge.  Stop by the site and check out the rules for yourself.  While you are there, have a look around.  They have some really awesome images.

This time around I decided to make another birthday card.  Here is my project and the details.  I hope I haven't forgotten anything important...

General Information:

  • This card has been created mostly digitally and then printed and assembled.  The image itself was coloured using a combination of digital 'colouring' for the background and then by hand for the main part of the image.
  • I also chose to use one of the older sketches from From the Hearts Stamps Sketch.   

 FRONT 
Digital Image Details: 
  • The image on the front, Inner Tube Birdbrain, is available for purchase over at From the Heart Stamps. Click HERE or on the watermark below to go to its location in the store.
  • If you missed out, you can still play along with the challenge by purchasing the image. Then you can enter the challenge and receive next month’s digi free. Alternatively, if you spend $10 in the From The Heart Stamps store this month, you'll receive the image for free.  To find the special code you need, be sure to check out the original post by clicking HERE.
Inner Tube Birdbrain by FromTheHeartStamps
  • The sky and water were created using patterns courtesy of Webtreats, Etc.  The main part of the image was coloured in mostly with Copic Markers although I did use coloured pencils for the umbrella, lip of the coconut and the straw.
Digital Embellishments: 
  • The tag shape was created using a template from Marisa Lerin, Pixel Scrapper.  I then used a water pattern from Webtreats, Etc., simply changing the colour of it to better match the colours on my card.
Digital Sentiment Details: 
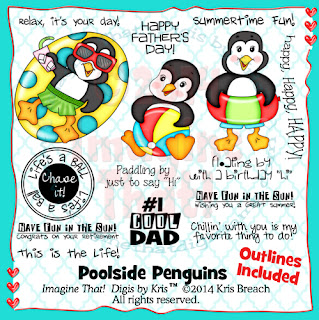
  • Once again I have relied on this great sentiment from Imagine That! Digis by Kris.  It can be used in so many different kinds of situations.  I think I've used it four times in the past two months!  You can find it in the Poolside Penguins set.  Click on the watermark below to find this set in the IT store.
http://www.imaginethatdigistamp.com/store/p227/Poolside_Penguins.html

INSIDE  
Digital Sentiment Details: 
  • This great sentiment was created by Paulette from Create with TLC.  I picked it up as a freebie a while back.  Check out Paulette's wonderful blog by clicking HERE or click HERE to go to the store.

OVERALL 
Paper Products: 
  • Card, image and sentiment bases: Michael's Recollection's Cardstock, white. 
Digital Embellishments: 
  • The shapes used for matting in behind the image and sentiment are simple shapes created in Photoshop Elements and paper pieced with a digital paper from the Sizzlin' Summer set (details on this set below).
  • The shadows to give each element some depth were created with a layer style, from Sheila Reid, Pixel Scrapper.
Digital Paper Products: 
  • The background sand texture used on the front and inside, along with the blue textured paper, are from the Scribble Doodles Designs set I created called Sizzlin' Summer You can get it in the Textures only pack for $1.99 or as part of the complete set of both patterned and textured papers for just $3.99.  Click on the watermarks below to find either set in the Scribble Designs store.
http://buyscribblesdesigns.blogspot.ca/2014/08/dp-001-sizzlin-summer-paper-set.html

Challenges I am hoping to enter: 
Others I might get it into...
 
At the rate I'm going I'm going to run out of month before I get everything done that needs doing, including trying to get a Wonderful Wednesdays creation and post done for tomorrow.  I'll do my best but I may end up having to do two next month if I can't get it done tonight.  So, I'll say adieu for now and run off to the next item on my list!
 
Until next time,

Saturday, July 25, 2015

Card Design: Imagine That...Treat Stand

Did you miss the special blog hop going on until July 28th to help raise funds for a special lady undergoing cancer treatment?  I created a special sentiment set and a digital paper set specifically for this fundraiser.  Click HERE for all the details.


Hello everyone.  I'm here today to present my second Imagine That! Digis by Kris project for July.  However, before I get to it I just wanted to share some of what has been happening over at the Imagine That! blog these past few weeks.

New Sets in the Store

  • This month Imagine That! Digis by Kris is focussing on Christmas in July.  As such, Kris has come up with some adorable new sets perfect for getting some of those much needed holiday cards started.  The great thing about these sets is that they are not only suitable for Christmas but have everyday options as well.  Check them all out.  Clicking on any of the watermarks below will take you to their section in the store.


Free Stuff

  • Are you new to Imagine That! Digis by Kris and want to try before you buy?  Well you can find six different images in the free section of the store.  Click HERE to head there now.

Special Giveaway

  • Don't forget you still have time to win one of three sets of 50 Christmas themed digital brads.  For task #3, there is only one card linked up so if you have a card linked in the IT Digi Stamp of the Month link up, why not come over here and link it up on this blog as well for your chance to win one of the sets??!!  Right now the odds are pretty good.  If you've already got the card made, it will just take another moment to link it up over here too.  Be sure to check click HERE for all the details. 

Well that is what is new and exciting over at Imagine That!  Of course we still have our July challenges going on and you can find the links you need at the bottom of this post.  Right now, it is time to check out my latest project...

My Creation

General Info:

  • This card has been created 100% digitally and then printed and assembled.
  • This latest card makes...
    Christmas Cards to date for 2015:  18
    ...and here it is...

FRONT
Digital Image Details: 
  • Treat Stand: This time around I've opted to use the Treat Stand set which is currently the set for the DOTM (see details below).  Another great set with a Christmas or everyday option.  As always you get several sentiments + you also get four digi papers--two Christmas themed and two general themed-- all for the low price of $2.50 for the remainder of this month!!!  Please click on the name or watermark found in the 'new release' section above, to find the set in the store. 
Digital Embellishments:
  • I have used one of the brads from the Gingerbread Brads special collection that I created.  Want you chance to win one of three sets??!  Just check out the 'special giveaway' section above.


INSIDE
Digital Sentiment Details: 

OVERALL   
Paper Products: 
  • Card base: Michael's Recollection's Cardstock, white.
Digital Paper Products: 
  • One from the Baking Chloe set.  Please click on the name or watermark found in the 'new release' section above, to find the set in the store. I have simply enlarged and shifted the paper for a more pronounced diagonal.
Digital Embellishments: 
  • I have created basics shapes in Photoshop Elements in behind the image, brads and sentiment.
  • I have applied shadow layer styles to give each element some depth.  This style is courtesy of Sheila Reid, a designer at Pixel Scrapper.   
Challenges I am hoping to enter... 

Don't Forget to Check out the IT Challenges...  

Don't forget that there are two different ways you can link up over on the Imagine That blog.


D.O.T.M. Challenge Click on the image on the left for the current Stamp of the Month Challenge! There is still one week left so you have lots of time to enter.
  

Click on the right image for the current use ANY IT! digi challenge!  This challenge is now simply a link up for any creation made with an IT image.  A draw will be made after every 10 submissions.
Well folks, that is it for today.  If you frequent the IT blog, you'll actually see parts of this post over there as the DT are now posting there too.

Stay tuned for more Imagine That! Digis by Kris creations coming your way soon. along with all my regular features and design team posts. 

Until next time,