Showing posts with label tutorial. Show all posts

Friday, January 24, 2014

Tutorial: Setting Your Blog System Time to Reflect Your Time Zone

Hello everyone.  How is your Friday going?  Or your Saturday for that matter if you are on the other side of the world?  My peeps in New Zealand and Australia are just about to, or have just begun their Saturday.  Our tomorrow, their today.  Boy this can get confusing.  It can become even more complicated if you don't have your blog set up to match the correct time in your time zone.  In fact, I've run across several people who still have their blog set to Pacific Standard Time (PST), which appears to be the factory setting, even though they may live on the east coast of North America or somewhere in Britain.  That can get awfully confusing, especially if you are on a design team and need to be publishing your posts at a specific time.  For example, you live in England and the blog you represent lives in Ontario, Canada.  There is a five hour difference between these two zones.  So your blog leader wants you to publish your post at 8:00 am EST.  Well, your first thought will be to add five hours to that time to make a publishing time of 1:00 p.m.  However, you haven't set up your blog clock to match your time zone so now you have to do some more math and figure out what the difference is between PST and EST.  Oh and of course, then you have to think of the five other teams you are on which just happen to be in five different time zones.  Wouldn't it just be easier to set your blog up with your correct time?  Well, I promise you the process is quick and painless and will take you less time to fix than it did for you to read this paragraph.

Here are the simple steps to get your clock set up:
  1. Go to your Blogger dashboard.
  2. Click on Settings.
  3. Click on Language and formatting.
  4. Under the word Formatting you will see the words Time Zone.  Click on the drop down menu.
  5. Scroll down until you find your proper time zone.
  6. Make sure you click the orange 'Save Settings' button on the top right hand corner or the changes will not become effective.
Or if you are more of a visual learner, follow the diagrams below:

Hope that helps you out if you are still stuck on factory settings!  If all goes well, I'll be seeing you two more times today.  I've got a couple progressive challenge posts to put together.  Hopefully, I can get it all in.  It hasn't helped that I had no access to Blogger or Gmail for over an hour this afternoon.  Don't those servers know they aren't allowed to go down when I need to work!!!

Anyways, I'll see you all soon with a new card--hopefully.

Until next time,

Follow on Bloglovin

Sunday, June 30, 2013

Bloglovn' Mini Tutorial for Adding Widgets to Your Blog

It looks like there were a few of you who found the tutorial for claiming your blog on Bloglovin' helpful.  I'm glad I was able to help those of you who still hadn't made the move to get your blogroll set up.  Well, now I am here to hopefully assist those of you who are unsure how to proceed for adding the Bloglovin' widgets such as the 'follow me' and 'total number following' buttons.  One of my friends needed a hand and since I created the tutorial for her, I figured the least I could do is share it with any of you having difficulties with this process.

In order to add the widgets to your blog, you will need to make sure that you have signed in to Blogger and pull your blog up as well, as you will need to go back and forth between Blogger and Bloglovin'.
  1. Open up a new window in your Internet browser.
  2. Go to Bloglovin'.  Click HERE for a shortcut to get there.
  3. When you get to Bloglovin' sign in.
  4. Hover your mouse over the white heart contained within the blue box (unless you've uploaded your picture which will take the place of the heart).
  5. Scroll down and choose 'Bloglovin' Button'.  This will bring you to the page with all the button choices.
    .
  6. Choose the one you want from the 'Bloglovin' Buttons' options and click on 'Get this icon'.
  7. A box will come up giving you the code you need.
  8. Go back over to Blogger and choose 'Layout'. 
  9. Click on 'Add Gadget' wherever you want to put the button.  Remember you can always drag and drop later to move it around.
  10. In the 'Add a Gadget' window options, scroll down and choose, HTML/JavaScript Add
  11. This will pull up the area that you will plug your code into.
  12. You can put in a title if you want to but you don't have to.
  13. Now go back to Bloglovin' where you have the box pulled up that says 'This code is created for <<<your blog name>>>'

  14. Click anywhere in the box and hit 'ctrl A' to copy it all.
  15. Now go back to Blogger where you have your html box up, click in that empty space and paste.
  16. Click save.Rearrange the button where you want it on your layout page and remember to click on 'save arrangement' before leaving this page.
The same instructions work for adding counter or artist icon widgets.

If you are unclear with any of these steps, just let me know. Good luck!

Until next time,

Thursday, June 27, 2013

Bloglovin' Mini Tutorial for Claiming Your Blog

I am sorry it has taken me so long to get this posted.  I've now had a few people ask me to help them out with getting set up over on Bloglovin'; so, I figured that since I've already created a tutorial of sorts, I might as well share it with all of you.  We've been told that Google Friends Connect will be sticking around and that it is only Google Reader that will disappear as of July 1st but I guess we'll just have to wait and see what happens.

For those of you who have already set yourselves up, that is wonderful, but for those of you who haven't and are wondering how, then this post is for you.  These instructions are meant for those of you who have joined Bloglovin' already.  If you are having problems joining, let me know and I'll guide you through that process as well.  

In order to claim your blog, you will need to have a few windows open in your Internet program and go back and forth between Blogger and Bloglovin'.  A good time to claim your blog is when you already have to create a post.  If you are not scheduled to create one, you will need to just go ahead and create one for the purpose of claiming your blog.  I hope that the instructions are clear and concise.  If you have any problems following them, please do not hesitate to ask for assistance.  Please note that I did create the majority of this tutorial a couple months ago and have had to tweak it a bit because Bloglovin' changed their setup a bit.  I hope that as a result of those changes, I haven't missed anything.  Good luck!
  1. Go to Bloglovin'.  Click HERE for a shortcut to get there.
  2. When you get to Bloglovin' sign in.
  3. Hover your mouse over the white heart contained within the blue box.  Update:  If you have already signed up with Bloglovin' and inserted a picture, the white heart contained within the blue box will no longer be there and it will be your picture that you would click on.
  4. Scroll down and click on 'my blog'.
  5. You will see a blue button that says 'claim blog'.  Click it.
  6. A search box will come up.
  7. Type the name of your blog into the search box.  Click search.
  8. Your blog's name will appear in this box.  Click on the title.
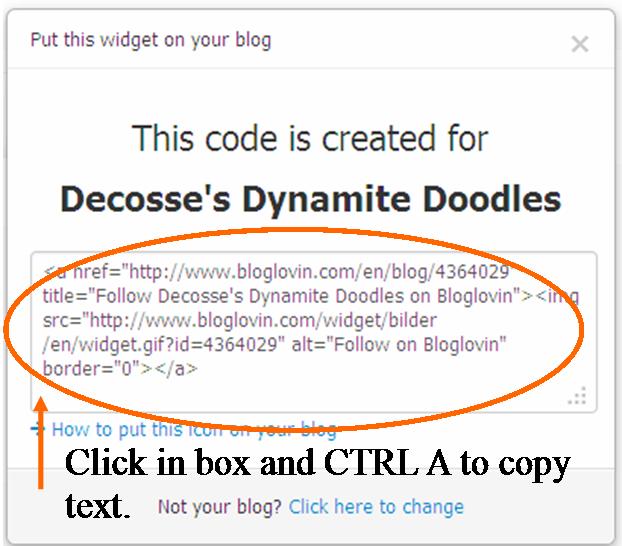
  9. A new box will come up that says 'claim blog' and it will have some HTML code that you will need to enter over on your blog in a new post.
  10. Leave this there and open a window to bring up blogger (if you don't already have it open).
  11. Click to create a new post.  It doesn't matter what it is about.  It could simply be letting everyone know that you are now set up on Bloglovin'.
  12. Now switch back to the window that has the box with the code you will need.  Put your cursor in the box and hit ctrl A to copy all the code.
  13. Go back to your blog.
  14. Now notice how you can switch between Compose & HTML see image below--left hand side
  15. Inline images 1
  16. Click HTML and then paste the code at the top of the post.
  17. Switch back to Compose and you will see, the words, "Follow my blog with Bloglovin".  Finish up your post like you normally would. 
  18. When you publish your post it will say 'Follow my blog with Bloglovin' at the top of your post.
  19. Go back to Bloglovin' and click the button "claim blog" to say you've completed it.  
  20. That should be it.  You can sign out of Bloglovin' at this point.
If you are unclear with any of these steps, just let me know.  If there is interest I'll also create tutorial's for adding the 'Follow Me on Bloglovin' buttons to your sidebar.

Until next time,